Skip to content


The asphalt paving process involves seven essential steps: site evaluation, demolition, grading, sub-base installation, binder course application, surface course laying, and final compaction. Each step builds on the one before it, and skipping or rushing any of them can shorten your pavement’s lifespan by years.
Whether you’re planning a new driveway or a commercial parking lot, understanding this process helps you make confident decisions and recognize quality workmanship.
Key Takeaways
- The asphalt paving process follows 7 core steps, from site evaluation through final compaction, and each one plays a direct role in how long your pavement will last.
- Sub-base preparation is the most critical step. A weak foundation leads to cracking, potholes, and premature failure, no matter how good the surface layer looks.
- Compaction quality determines pavement longevity. According to the Federal Highway Administration (FHWA), a 1% increase in compaction density can extend pavement service life by at least 10%.
- Properly installed asphalt can last 15 to 30 years with regular sealcoating every 2 to 3 years and routine maintenance.
- Working with a licensed paving contractor protects your investment from costly shortcuts that cause early pavement failure.
What Is the Asphalt Paving Process?
The asphalt paving process is the complete sequence of steps required to install a durable, weather-resistant paved surface for driveways, parking lots, roads, and other applications. It combines precise site preparation, quality materials, and professional compaction techniques to create a surface that can handle daily traffic, water exposure, and temperature changes for decades.
Understanding each phase gives you the knowledge to evaluate contractor proposals, ask the right questions, and protect your property investment. If you’re new to paving, our basics of asphalt paving guide is a great starting point.
What Materials Make Up Asphalt Pavement?
Asphalt is an engineered mixture of aggregates (crushed stone, gravel, and sand) bound together by bitumen, a sticky, petroleum-based binder. When heated and mixed at an asphalt plant, these components form hot mix asphalt (HMA), which is the industry standard for driveways and roads.
One notable aspect of asphalt is its recyclability. According to the National Asphalt Pavement Association (NAPA), more than 93% of reclaimed asphalt pavement (RAP) is reused in new asphalt pavements, making asphalt America’s most recycled material. NAPA survey data shows that RAP usage during the 2022 paving season alone saved over $4.7 billion compared to using all virgin materials.
Audrey Copeland, PhD, PE, President and CEO of NAPA, has noted that industry members continue to lead the way in reusing pavements and adopting innovations like warm-mix asphalt, demonstrating a strong commitment to sustainability and cost efficiency.
Why Does Each Step Matter for Long-Term Performance?
Every step in the asphalt paving process exists for a specific structural or performance reason. Skipping site evaluation can lead to drainage failures. Rushing sub-base preparation creates weak foundations. Poor compaction leaves air voids that let water infiltrate and destroy the pavement from within.
Research published by the Transportation Research Board found that a 1% increase in air voids above the base level of 7% tends to produce roughly a 10% loss in pavement life. That single statistic explains why professional contractors focus so heavily on doing each step correctly.
The 7 Steps of the Asphalt Paving Process
Here’s a detailed look at each phase of a professional asphalt paving project. Whether it’s a residential driveway or a large commercial parking lot, these steps form the foundation of quality paving work.
Step 1: Site Evaluation and Project Planning
Every successful asphalt paving project starts with a thorough site evaluation. A professional contractor will assess the existing surface condition, measure the area, evaluate soil composition, and identify drainage patterns before any equipment arrives.
This phase also includes permitting, project design, and determining the appropriate asphalt thickness based on expected traffic loads. For residential driveways, a 2 to 4 inch asphalt layer over a compacted base is common. Commercial parking lots typically require 4 to 6 inches or more to support heavier vehicles.
Planning also involves scheduling. In South Texas, the hot climate makes timing important. For guidance on seasonal considerations, check out our article on the best season for asphalt paving.
Step 2: Demolition and Surface Removal
If an existing surface is present, whether it’s old asphalt, concrete, or pavers, it needs to be removed before new work begins. Contractors use heavy equipment like excavators, bobcats, and dump trucks to break up and haul away the old material.
This step creates a clean foundation for the new pavement. Many professional contractors recycle the old asphalt at their plants, turning deteriorated material into usable aggregate. James Mitchell, CEO of Superior Paving Corp. and former NAPA Chairman, has stated that the asphalt pavement industry takes sustainability seriously and consistently leads in keeping waste out of landfills while connecting communities across the country.
According to NAPA survey data, 95% of reclaimed asphalt pavement is reused in new pavement, and RAP usage has increased by 75% since NAPA began collecting data in 2009.
Step 3: Grading and Drainage Preparation
Grading is one of the most important steps in the asphalt paving process, and it’s often the most overlooked by less experienced contractors. Proper grading ensures that water drains away from the pavement surface rather than pooling on top of it or seeping into the foundation.
Water is the number one enemy of asphalt pavement. The Virginia Asphalt Association notes that highway engineers have recognized the critical necessity of good drainage in pavement design and construction for more than 2,000 years.
Professional contractors use laser-guided transits and automatic motor graders to establish precise slopes, typically 1.5% to 2.5% depending on the application. This ensures that rainwater flows toward designated drainage areas rather than accumulating on the pavement.
The historical importance of drainage was established by John L. MacAdam (1756 to 1836), one of the first pavement engineers to recognize that all pavements are ultimately supported by the subgrade and that drainage must protect it from moisture damage. His principles remain central to modern paving practice, as documented by Asphalt Magazine.
Step 4: Sub-Base Installation and Compaction
The sub-base is the structural foundation beneath the asphalt surface. Think of it as the backbone of your pavement. It’s typically built from compacted crushed stone or recycled aggregate, and it serves three critical purposes: load distribution, frost protection, and drainage support.
For residential driveways, the sub-base is usually 4 to 6 inches deep. Commercial projects may require 8 to 12 inches or more, depending on soil conditions and expected traffic. The sub-base must be compacted to the proper density using heavy rollers and vibratory compactors.
If the sub-base isn’t properly prepared, even the highest-quality asphalt surface will fail. One shopping center owner we worked with in the Bulverde area experienced exactly this kind of deterioration across their 50,000 square foot parking lot. By investing in complete resurfacing with an improved drainage system and proper sub-base preparation, they eliminated all drainage issues, extended the surface life by over 15 years, and reduced their annual maintenance costs by 40%.
For more on how asphalt paving works in our region, see our complete guide to asphalt paving in South Texas.
Step 5: Binder and Base Course Application
The binder course is a layer of large aggregate mixed with asphalt binder that sits between the sub-base and the surface layer. It acts as the structural glue, providing strength and stability to the pavement system.
This layer uses a coarser mix than the surface course and is designed to distribute vehicle loads across the sub-base. For commercial and industrial projects that handle heavy equipment traffic, the binder course is especially important.
The binder course is spread by a paving machine and then compacted with vibratory rollers to achieve the target density. According to Pavement Interactive, a study by Scherocman (1984) concluded that reducing air voids from 8% to 3% could more than double the pavement’s fatigue life. This finding underscores why professional compaction at every layer, not just the surface, is essential.
Step 6: Surface Course and Asphalt Laying
The surface course is the top layer of asphalt that you see and drive on. It’s composed of a finer mix of small aggregate, sand, and liquid asphalt, designed to provide a smooth, durable, weather-resistant driving surface.
Hot mix asphalt is delivered to the job site in insulated dump trucks and must be kept at the correct temperature, typically between 280 degrees F and 330 degrees F during laydown. If the mix cools below 250 degrees F before rolling, compaction becomes ineffective and weak spots will form in the pavement.
The paving machine spreads the hot mix evenly across the prepared surface. For residential driveways, the surface course is typically 1.5 to 2 inches thick after compaction. Commercial applications may require 2 to 3 inches or more.
Timing is critical during this step. Paving crews and rolling crews must coordinate closely to compact the material while it’s still at the right temperature. J. Richard Willis, PhD, Vice President of Engineering, Research, and Technology at NAPA, has emphasized that partnerships between industry and agency are essential for advancing quality standards and progress toward better-performing pavements.
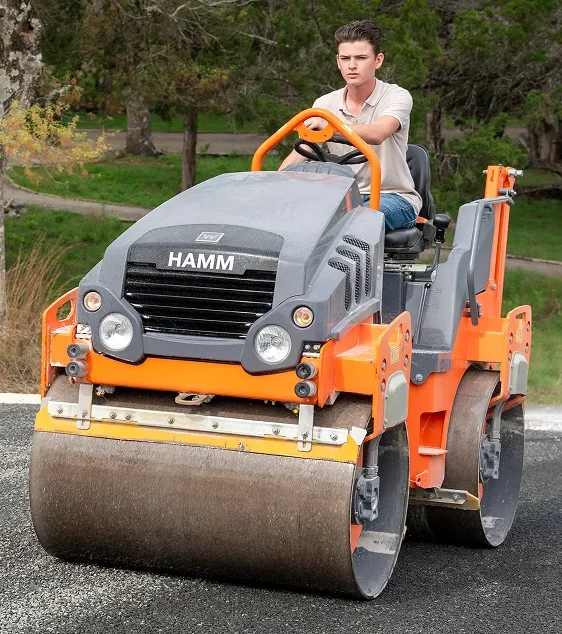
Step 7: Final Compaction and Finishing
Final compaction is arguably the most important step in the entire asphalt paving process. A heavy roller makes multiple passes over the freshly laid surface to eliminate air pockets, smooth out irregularities, and lock the asphalt into its final, dense form.
The Federal Highway Administration has confirmed through demonstration projects that a 1% increase in pavement density can extend service life by at least 10%. Research from the Texas Department of Transportation and Finn et al. (1973) found that fatigue properties can be reduced by 30 to 40% for each 1% increase in air void content.
Where new asphalt meets existing surfaces like sidewalks or adjacent driveways, contractors create butt joints to ensure smooth, seamless transitions. Edges are finished carefully to prevent trip hazards and water infiltration.

Asphalt Layer Thickness: Residential vs. Commercial
| Layer | Residential Driveway | Commercial Parking Lot |
| Sub-Base | 4 to 6 inches | 8 to 12 inches |
| Binder Course | Optional (light traffic) | 2 to 4 inches |
| Surface Course | 1.5 to 2 inches | 2 to 3 inches |
| Total Depth | 3 to 6 inches | 6 to 12+ inches |
| Typical Cost | $7 to $15 per sq ft | $3 to $8 per sq ft |
Sources: Angi/HomeAdvisor, The Pavement Grou
Why Is Proper Compaction So Important for Asphalt Pavement?
Compaction is the process of compressing freshly laid asphalt to increase its density and eliminate air voids. It’s the single most important factor in determining how long your asphalt pavement will last. Well-compacted asphalt can perform reliably for 15 to 20 years, while under-compacted pavement may fail in as few as 5 to 7 years.
Professional contractors target 92% to 96% of maximum theoretical density during compaction. Achieving this range prevents the interconnected air voids that allow water to penetrate and destroy the pavement structure from within.
How Air Voids Affect Pavement Fatigue Life
Air voids are small pockets of air trapped within the compacted asphalt. Some air voids are normal and even necessary, but too many create serious problems.
Research compiled by Pavement Interactive shows the following impacts of excessive air voids:
- Reduced fatigue life. Finn et al. (1973), working under the National Cooperative Highway Research Program, concluded that fatigue properties can be reduced by 30 to 40% for each 1% increase in air void content.
- Moisture damage. Air voids above 8% tend to become interconnected, allowing water to enter freely and weaken the pavement structure (Kandhal and Koehler, 1984).
- Raveling. Loose aggregate on the surface becomes a significant problem above 8% air voids and severe above 15% (Kandhal and Koehler, 1984).
- Accelerated aging. McLeod (1967) concluded in his Highway Research Board paper that compacting a well-designed paving mixture to low air voids slows the rate of asphalt binder hardening, resulting in longer pavement life and better all-around performance.
What Role Does Temperature Play in Compaction Quality?
Asphalt compaction is a race against time and temperature. Hot mix asphalt must stay between 280 degrees F and 330 degrees F during laydown. If the mix cools below 250 degrees F before rolling is complete, achieving proper density becomes nearly impossible.
Factors that affect the available compaction window include the thickness of the asphalt layer (thicker layers retain heat longer), the temperature of the surface underneath, ambient air temperature, and wind speed. In South Texas, the warm climate generally provides favorable conditions, but crews still need to coordinate closely to compact the material within the available time window.
Heather Dylla, Vice President of Sustainability and Innovation at Construction Partners Inc., has described how collaboration between agency engineers and asphalt mix producers helps advance construction quality and performance standards across the industry.
How Long Does the Asphalt Paving Process Take?
The total time required for an asphalt paving project depends on the size of the area, site conditions, and the scope of preparation work needed. Here’s what to expect for typical projects.
Residential Driveway Timelines
Most residential driveway paving projects, including a standard two-car driveway of roughly 600 to 800 square feet, can be completed in 1 to 2 days. A straightforward overlay on a solid existing base may take as little as a single day. Projects that require full demolition, grading, and sub-base installation will typically take 2 to 3 days.
The average cost for a residential asphalt driveway runs between $7 and $15 per square foot installed, including materials and labor. Most homeowners spend between $3,000 and $7,500 total, depending on driveway size, site conditions, and the thickness of the asphalt layers.
Commercial Parking Lot Timelines
Commercial paving projects are more complex and take longer. A mid-sized parking lot may require 3 to 5 days, while larger projects with extensive grading, drainage work, or multiple binder layers could take a week or more.
Commercial asphalt paving typically costs between $3 and $8 per square foot, with larger areas benefiting from economies of scale. Scheduling is important because weather delays can extend timelines, especially during unexpected rain events.

What Should You Do After Your Asphalt Is Installed?
Your asphalt pavement’s long-term performance depends on what you do after the paving crew leaves. Proper curing and regular maintenance protect your investment and extend the lifespan of your surface.
Curing Period and Usage Guidelines
Fresh asphalt needs time to harden and reach its full strength. Here are the general guidelines:
- Wait 24 to 48 hours before driving on the new surface.
- Avoid parking heavy vehicles in the same spot for the first week. Stationary weight can create depressions in the still-soft asphalt.
- Keep sharp objects off the surface. Bicycle kickstands, ladder feet, and lawn furniture legs can dent fresh asphalt during the first few weeks.
- Wait 90 days to 6 months before applying sealcoat. The asphalt needs to fully cure and off-gas before sealing.
For a deeper dive into curing timelines, read our guide on how long it takes asphalt to cure.
Sealcoating and Preventative Maintenance
Sealcoating is one of the most effective ways to extend your asphalt pavement’s lifespan. It creates a protective barrier against UV rays, oil stains, water intrusion, and oxidation.
Industry experts recommend sealcoating every 2 to 3 years for residential driveways and high-traffic commercial surfaces. The cost is relatively low at $0.15 to $0.30 per square foot, and it can add years to your pavement’s functional life.
Beyond sealcoating, a solid preventative maintenance strategy includes:
- Crack sealing at the first sign of surface cracks to prevent water from reaching the sub-base.
- Regular sweeping to remove debris that can trap moisture and stain the surface.
- Prompt spill cleanup for oil, gasoline, and other petroleum-based fluids that dissolve asphalt binder.
- Periodic inspections to catch small issues before they become expensive repairs.
With consistent maintenance, a well-installed asphalt surface can last 15 to 30 years. For detailed sealcoating guidance, visit our asphalt sealcoating guide.
Invest in the Process, Protect Your Property
The asphalt paving process is a carefully sequenced series of steps, and each one matters. From the initial site evaluation through final compaction, quality workmanship at every stage determines whether your pavement lasts 5 years or 25 years.
The key takeaways are simple. A strong sub-base is your pavement’s foundation. Proper drainage prevents the water damage that causes most asphalt failures. Professional compaction, backed by research from the FHWA and Transportation Research Board, is the single biggest factor in long-term performance.
At C. Brooks Paving, we follow every step of this process with the care and precision your property deserves. We serve homeowners and commercial property owners throughout Bulverde, TX and the greater South Texas Hill Country region.
Ready to start your paving project? Contact C. Brooks Pavingfor a free consultation and let our experienced team help you make the best decision for your property.